 |
| Private Cloud |
Note: This tutorial only works Windows 7 & later MS
OS.
Building your own FTP (File Transfer
Protocol) server can be one of the easiest and most convenient solutions to
transfer file through a private or public network without limitations and
restrictions typically found with most cloud storage services.
There are also many benefits running your FTP
server.
A. It’s private, and you have absolute control.
B. It’s fast (depending on your internet
connection speeds), and there is virtually no limits on the amount and type of
data you can store.
C. You don't have restrictions on file sizes
either, which means that you can transfer something as small as a text file or
a 1000GB PC backup, and you can even create multiple accounts to let friends
and family access or store content remotely too.
Windows includes the necessary
components to run an FTP server. Follow the steps below to install an FTP
server on your PC:
1. Use the Windows key + X keyboard shortcut to open the Power
User menu and select Programs and Features or open Run menu and type appwiz.cpl
and press enter.
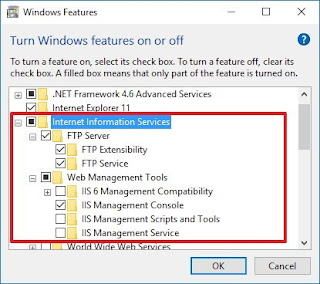
2. Click the Turn Windows features on or off link.
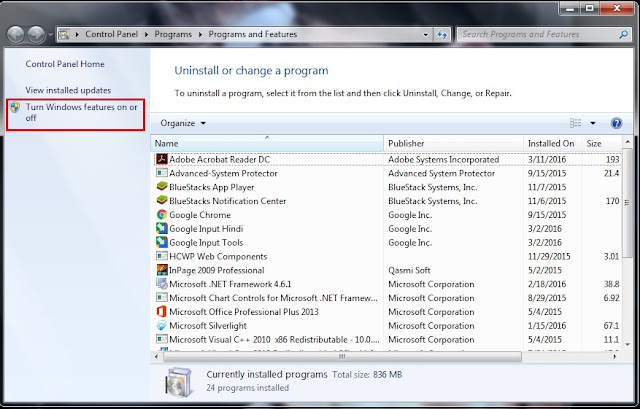 |
| Add or Remove Program |
3. Expand Internet Information Services and check the FTP Server option.
4. Expand FTP Server and check the FTP Extensibility option.
5. Check Web Management Tools with the default selections.
6. Click OK to begin the installation.
7. Click Close.
How to configure an FTP site on Windows 10
After installing the necessary components to run an FTP server on your
PC,
you need to create an FTP site using the following instructions:
1. Use the Windows key + X keyboard shortcut to open the Power
User menu and select Control Panel.
2. Open Administrative Tools.
3.
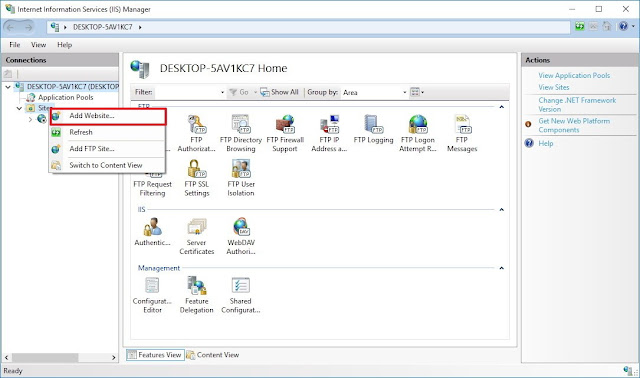
Double-click Internet Information Services (IIS) Manager.
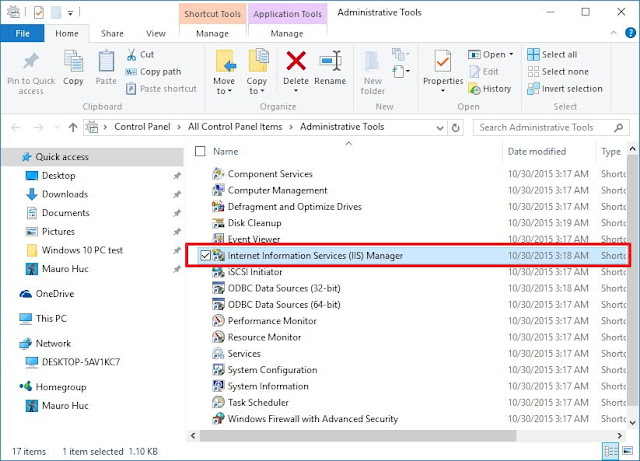 |
| Administrative Tools |
Expand and right-click Sites on the Connections pane.
Select Add FTP Site.
4. Name your new FTP site and enter the path to the FTP folder you want to
use to send and receive files.
Note: You
can also use the Make New Folder button to create a specific folder
to store your FTP files.
5. Click Next.
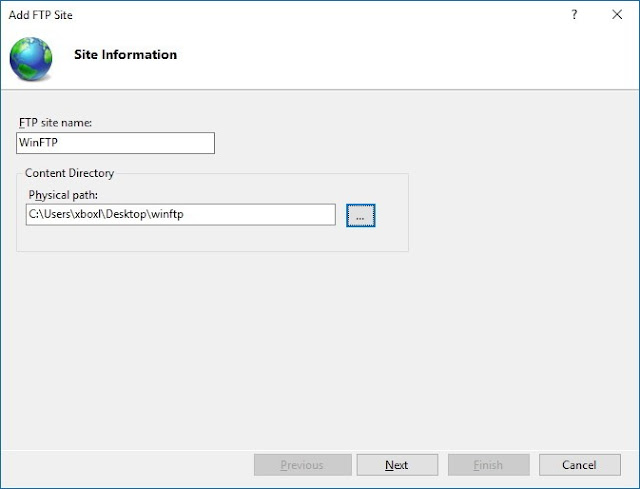 |
| Add FTP Site |
6.
On Binding and SSL Settings leave all the default settings, but change
the SSL option to No SSL.
Note: It's
worth pointing out that in a business environment or on an FTP server that will
host sensitive data, it's best practice to configure the site to require SSL.
7.
Click Next.
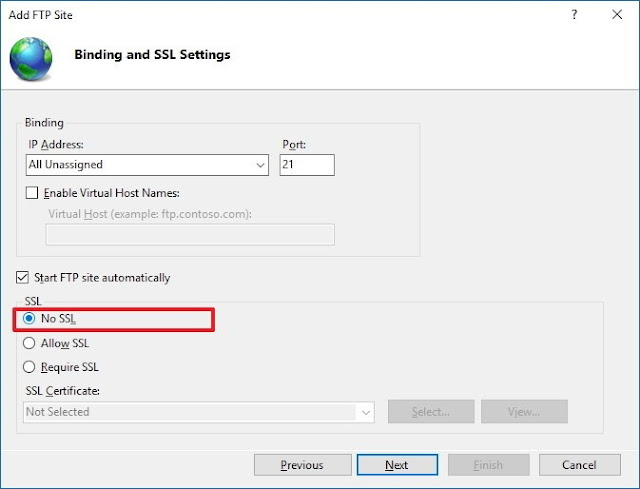 |
| Add FTP Site |
8.
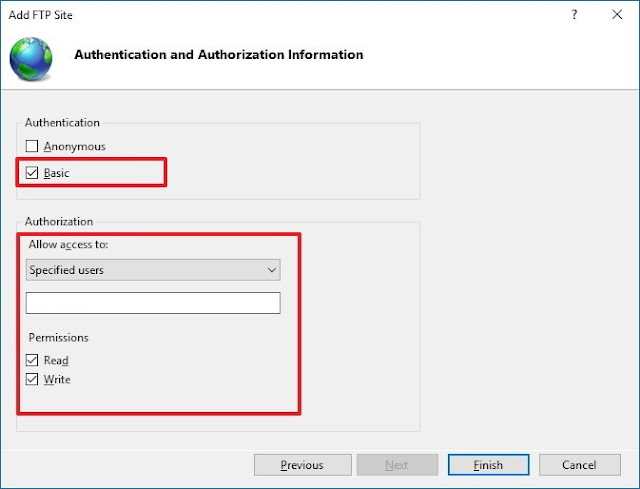
On Authentication, check the Basic option.
9.
On Authorization, select Specified users from the drop-down
menu.
10. Type the email address of your Windows 10 account or local account name
to allow yourself access to the FTP server.
11. Check the options Read and Write.
12. Click Finish.
 |
| Add FTP Site |
How to allow an FTP server through Windows Firewall
If you have Windows Firewall running on your computer, then the security
feature will block any connections trying to access the FTP server. Use the
steps below to allow the FTP server through the firewall.
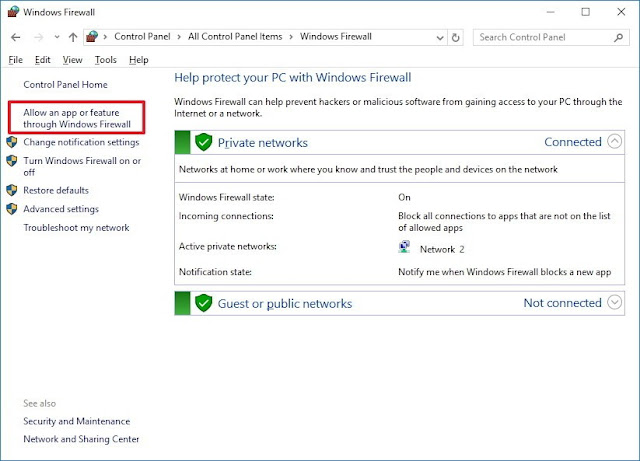
1.
Open
the Start menu, do a search for Windows Firewall, and
press Enter.
2.
Click
the Allow an app or feature through Windows Firewall link.
 |
| Windows Firewall |
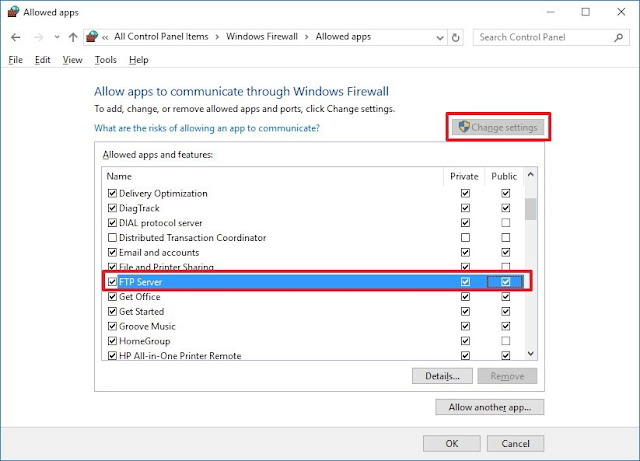
3.
Click the Changes settings button.
4.
Select FTP Server and make sure to allow it on
a Private and Public network.
5.
Click OK.
 |
| Allowed Apps Windows Firewall |
At
this point, you should be able to use your favourite FTP client to connect your
newly created FTP server from your local network.
Note: Make
sure to check your software vendor support website for specific instructions to
allow an FTP server, if you're using another security software other than the
Windows Firewall.
How to access an FTP server from any PC
Here's the quickest way to test your FTP server, after configuring the
firewall, and forwarding port 21 on your router.
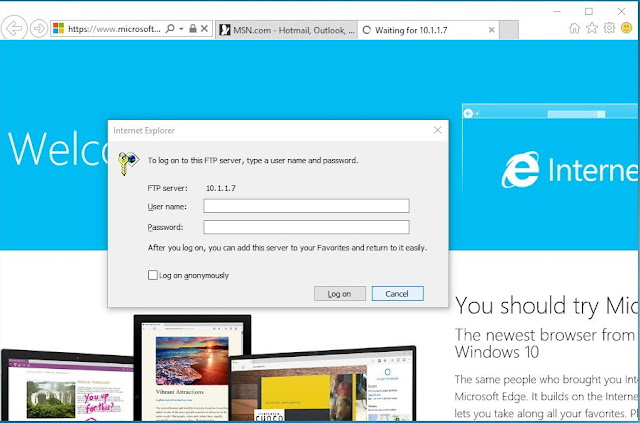
Open your default web browser and in the
address bar type your Windows 10 PC IP address, on an FTP link format, and
press Enter. The address should look like this: FTP://192.168.1.105.
 |
| Internet Explorer |
Note: I'm using Internet Explorer, because Microsoft Edge seems not
to include the functionality to browse FTP sites. You can also opt to use
Chrome, Firefox, or another modern web browser.
To test if your FTP server is reachable from the internet, visit Google
or Bing, do a search for"What's my IP?". Note your public IP address
from the results and type it into the address bar using the FTP link format and
press Enter.
If you get a login prompt, then everything is working as expected.
Simply enter your account credentials and you're should be able to sign-in.
SHAHABAJ SHAIKH is an end-user Windows enthusiast, a Microsoft MCP in Windows Server.
Please read the entire post & the comments first, create a System Restore Point before
making any changes to your system & be careful about any 3rd-party offers while installing
freeware.
SHAHABAJ SHAIKH is an end-user Windows enthusiast, a Microsoft MCP in Windows Server.
Please read the entire post & the comments first, create a System Restore Point before
making any changes to your system & be careful about any 3rd-party offers while installing
freeware.


This is very good info with explanation
ReplyDeleteNice blog... I really want to know how to create a private cloud. I found this article very helpful. Thanks for sharing
ReplyDeleteThank you for sharing! This article is very helpful and easy to understand. Have a good day!
ReplyDeleteTerrible advice to not use SSL. I think the writer of this article has never heard of Wireshark...
ReplyDeleteThank you for your valuable content , Easy to understand and follow. As said, the migration to cloud is very essential for the protection of the database.Cloud Migration Services
ReplyDelete