,

How to Remove Built-in Apps in Windows 10
How to Remove Built-in Apps in Windows 10

PowerShell
PowerShell

First of all what is PowerShell? 

PowerShell is just an advanced version of command prompt. By using PowerShell, you can remove any store app you want to remove, even if it’s built-in app such as Music or Photos.
§     First you need to open PowerShell with Administrator right. Do this by typing “PowerShell” into the search bar on Taskbar, right click the result PowerShell and select “Run as Administrator”

§     In PowerShell, run the command below. This command searches for the app package whose name contains the word you specify in app_name (e.g. run Get-AppxPackage *maps* to find the package(s) for any app that has the word “maps” in its name). You want to do this to get the full package name so you won’t accidentally delete other apps when there is more than one app that has the name you’re looking for.

Get-AppxPackage *app_name*
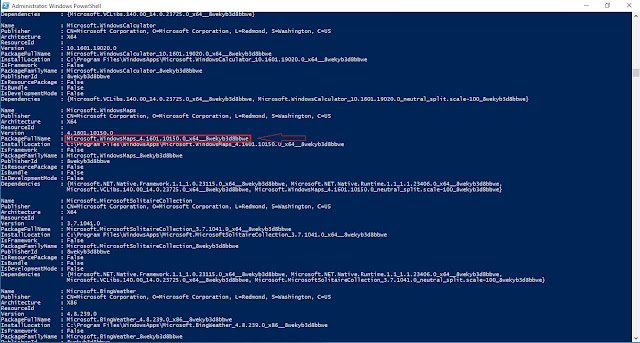
PowerShell Get-AppxPackage


§     Once you run the command, what you need to look for is “PackageFullName” line. Copy the full line by       clicking the beginning of the name and drag your mouse to the end of the line. The line looks like this: 
      Microsoft.WindowsMaps_4.1601.10150.0_x64__8wekyb3d8bbwe
            After copying PackageFullName type clear in powershell and press enter.
      Then type Remove-AppxPackage PackageFullName 

      Remove-AppxPackage Microsoft.WindowsMaps_4.1601.10150.0_x64__8wekyb3d8bbwe


And that’s all…!!!

Share a Folder in Windows 10, 8.1, 7 without password

Share a Folder in Windows10, 8.1, 7 without password
First of all, I want to thanks all of those guys who read my blog (Articles) for education, troubleshooting or reference. Thanks all of you once again.
Shared Folder
Shared Folder


Now back to business, we are here today to create a shared folder in windows 10, 8.1, 7 without password. Which means a client can access a folder without password.  

I recommend all you guys do not create this scenario if your data is highly important and sensitive.

We need some things configured in computer where the share folder is created. Make sure your IP configuration settings, LAN connectivity between clients and server, you should have admin credentials for doing this.

Create a folder and give it a desired name.


Right click on folder and choose Properties and select Sharing tab. 
Shared Data Properties
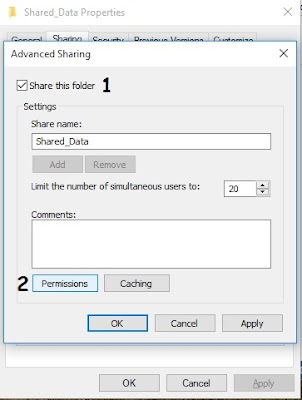
 Click on Advanced Sharing button the Advanced Sharing window will open.
Advanced Sharing
Click on Share this folder and make sure it has tick mark after clicking.
Give name, this will be your share name.
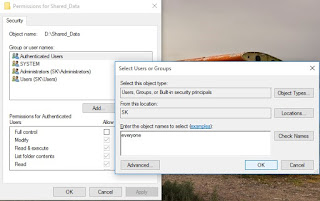
Click on Permissions button, then click on Add, Type Everyone and click on OK.
Advanced Sharing
Advanced Sharing
Permissions for Shared Data

In Allow section select Full Control check box.

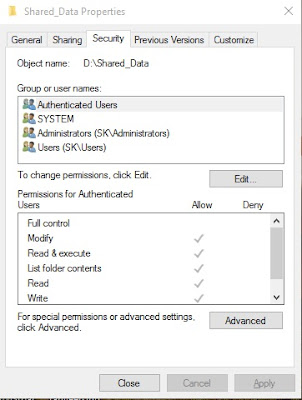
Now click OK, OK, then goto Security tab. Click on Edit. Type everyone and select OK.
Security
Security
Select User and Group
After this click on Full control check box then press OK and OK.
Now one more and only setting we have to change and it’s in Network and Sharing Center.


To access Network and Sharing Center right click on internet icon. (shown near date and time)
And select Network and Sharing Center then click on Changed Advanced Sharing settings.

Change Advanced Sharing
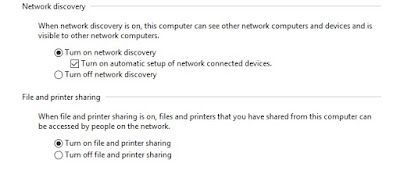
Make sure you turn on Network Discovery, File and Printer sharing and
Network Sharing Center
Password protected sharing.
Network Sharing Center

Boom. Done. Very short and simple settings we have to do. Guys If you have any problem while doing above steps please feel free to contact me by Email.

Convert a hard disk partition into NTFS format in Windows 10, 8.1, 7.


Convert hard disk partition into ntfs in Windows 10, 8.1, 7

Hard Disk
Hard Disk
Have you ever run into a problem while trying to select a destination to save your backup? If yes, the problem might have persisted due to one of the following reasons:
1.   The destination is the drive itself that you are trying to back up. You cannot backup a disk to itself. For example, you cannot backup the contents of drive D: to drive D:
2.   The destination is the tape drive and it is certainly not possible to save backups to tapes.
3.   The destination is not formatted as New Technology File System (NTFS), File Allocation Table (FAT) or Universal Disk Format (UDF). Backups can only be saved to disks that are formatted using one of the above systems.
Note:The reason is our topic of discussion so, in the post we will learn how to convert a hard disk or partition to NTFS format.

Now, one may wonder why should one convert a hard disk or partition into NTFS format? Well, if you aren’t aware, the NTFS file system provides better performance and security for data on hard disks and partitions or volumes than the FAT file system used in former version of Windows.
Do note that, once you convert a partition to NTFS format you cannot change it back to some other format easily. You will be required to reformat the partition which erases all the data stored on that disk.
If you have a partition that uses the earlier FAT16 or FAT32 file system, you can convert it to NTFS by using the convert command. Doing so will not affect the data on the partition in any way.

Convert hard disk or partition to NTFS format

Firstly, if you are running any program that is on the drive to be converted to NTFS format, it is recommended to close that program so that you can proceed further.
Next step is to click on the ‘Start’ button, choose All Programs and then Accessories.
Now, right-click on Command Prompt and choose the ‘Run as administrator’ option.
If you are asked for an administrator password or confirmation, enter the password or provide confirmation so that the process of conversion is not interrupted at any point.
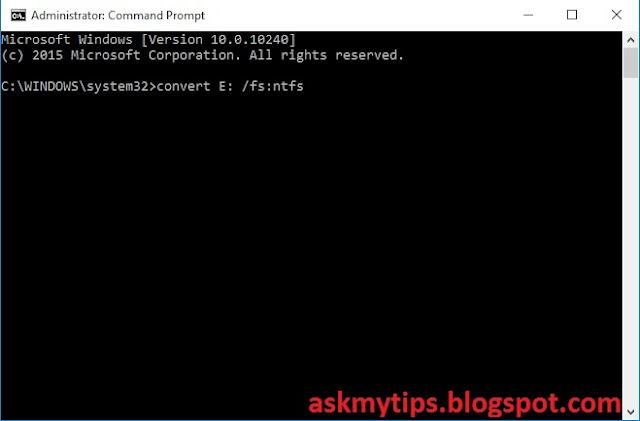
Once the elevated command prompt window is opened, type the following command and hit Enter:

convert drive (Drive of your choice)/fs:ntfs

CMD Convert Drive
CMD Convert Drive
For example to convert drive E to NTFS format type: convert E: /fs:ntfs. This would convert drive E to the NTFS format.

That’s it! If at all, the partition you are converting contains system files, the files present in the drive on which your operating system is installed such as C: drive you will be required to restart your computer for the conversion to complete successfully. Moreover, if your disk is full, you may get an error; hence, it is best to clear or remove unwanted files or at least back them up to a suitable location so that you free up some disk space.


Convert Basic Disk into Dynamic Disk in Windows 10, 8.1, 7.


Convert Basic Disk into Dynamic Disk in Windows 10, 8.1, 7
Hard Disk
Hard Disk

Convert Basic Disk into Dynamic Disk in Windows 10, 8.1, 7.


This post is about converting basic disk into dynamic disk but first and for most before we go further I’m going to tell you basics about Basic Disk and Dynamic Disk. 


What is Basic Disk?

Basic disk is most widely used format. Basic disks use partitions to manage data and one partition cannot share and split data with other partition. On Basic hard disk we can create two styles of partitions, namely “MBR (Master Boot Record)” and “GPT (GUID Partition Table)”. Basic disk contains like Primary Partition, Logical Partition which are typically formatted with file system.

What is Dynamic Disk?

Dynamic disk uses dynamic volumes to manage data. Dynamic Disk create fault-tolerant volumes that may even span multiple disks - which Basic Disks cannot.

Operations than can be performed on both, Basic and Dynamic disks:

  1. Check Disk properties, Partition properties and  Volume properties
  2. Establish drive-letter assignments for disk volumes or partitions
  3. Support both MBR and GPT partition styles.
  4. Convert a basic disk to a dynamic disk or a dynamic disk to a basic disk.

Operations that can be performed only on Dynamic disks:

  1. Create and delete simple, spanned, striped, mirrored, and RAID-5 volumes.
  2. Extend a simple or spanned volume.
  3. Remove a mirror from a mirrored volume
  4. Break the mirrored volume into two volumes.
  5. Repair mirrored or RAID-5 volumes.
  6. Reactivate a missing or offline disk.
So let’s Convert Basic Disk into Dynamic Disk

Before you start this process, I recommend you to take full backup of your important files into external disk, so before proceeding be careful..


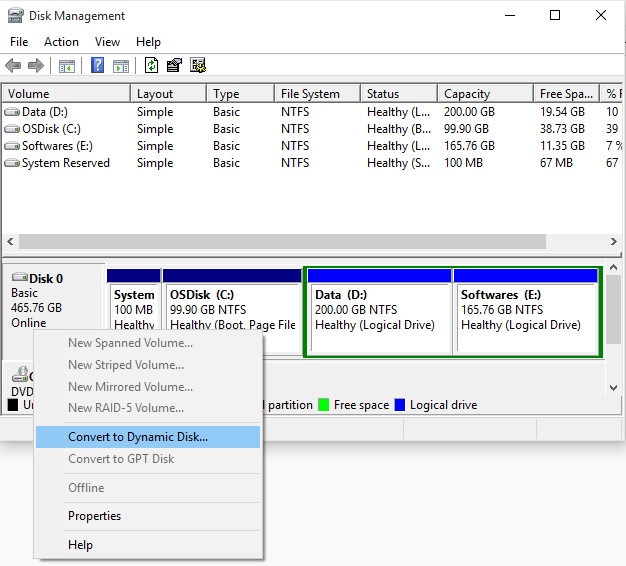
Disk Management Console

Open the Run menu by typing Win+R button and type diskmgmt.msc. Hit Enter. Right-click on the Disk and select Convert to Dynamic Disk. You will asked to once again confirm the Disk and click on Convert later on. The process will start and the Disk will be converted to a Dynamic disk.

Diskpart
CMD Diskpart

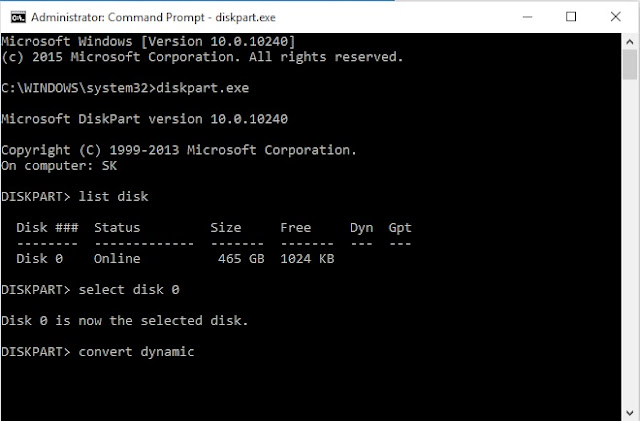
Open an elevated command prompt, type diskpart and hit Enter.
Next, type list disk. Make note of the disk number of the disk you want to convert to Dynamic.
Now type select disk n and press Enter.
Next type convert dynamic and hit Enter.

That's all about Conversion of Basic Disk into Dynamic and viz.