 |
| Office365Pro |
Hello Folks! Today we are going to know about how to download Microsoft office 365 product for offline installation. With the offline installer we can save a lot of internet bandwidth on mass deployment. First we need to download Microsoft Office Depolyment Tool. Below are links for Microsoft Office Depolyment Tool.
The tool exists in two versions for Office 2013 and Office 2016. Both tools are also suitable to create Office 365 installers, based on Office 2013 and Office 2016 respectively. The installation media that the deployment tool downloads are all based on the click & run technology.
 |
| Downloaded Files of Microsoft Office Deployment Tool |
The download is a self-extracting application that contains two files, setup.exe and configuration.xml. Extract those files into a folder of your choice.
Next step is
Configure the Office Deployment Tool (ODT)
before you start downloading the installation files, you need to modify the configuration file.
Copy the below code & replace it with configuration.xml
<Configuration>
<Add SourcePath="C:\Office365" OfficeClientEdition="32">
<Product ID="ProPlusRetail">
<Language ID="en-us"/>
</Product>
</Add>
<Updates Enabled="TRUE"/>
<Display Level="Full" AcceptEULA="TRUE"/>
<Property Name="AUTOACTIVATE" Value="1" />
</Configuration>
If you don't need to modify the configuration file, you can skip straight to step 3.
Step 3: Download the Office installation files
To download the installation files, create a new folder in C: drive & name it whatever you want. In this case we are going to name it Office_365. Now you need to open a command prompt and navigate to the Office_365 folder that contains the setup.exe and the configuration file. Now execute the following command.
setup /download configuration.xml
 |
| Download Office365Pro |
There is no progress indicator. Once all files are downloaded, the process will simply stop. The installation files are all contained in a subfolder called "Office". After the download is complete, the folder structure should roughly look as follows.
Step 4: Create a Self-Extracting Installer.
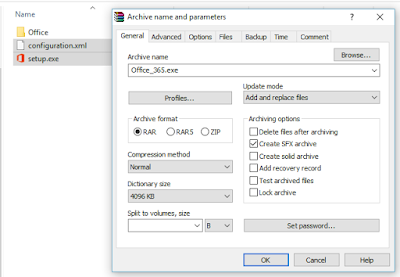
Let's create a self-extracting installer first, which can be used for easy storage and backup, as well as deploying the same software to multiple computers. The following steps are all based on WinRAR, but can be done with any archiving software that support self-extracting archives.
The archive needs to contain the files setup.exe, configuration.xml. On the WinRAR configuration screen, you need to tick the box Create SFX archive, and provide an archive name for the installer.
 |
| Office365Pro SFX |
Archive Name and Parameters
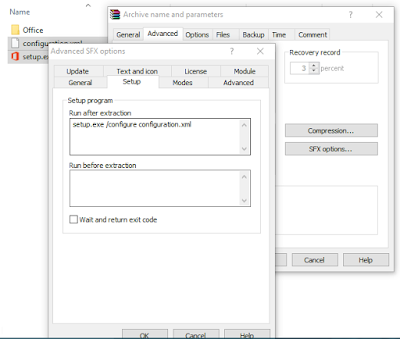
On the "Advanced" tab, you click the button to go to the SFX options.
Archive Name and Parameters
On the SFX options dialogue, you go to the "Setup" tab, and enter the following line into the textbox "Run after extraction".
setup.exe /configure configuration.xml
Advanced SFX Options
 |
| Office365Pro Advanced SFX |
That was already everything. You can WinRAR let do its job, and create an SFX installer of your download. Starting the SFX installer will install your Office product either with or without user interface, according to your configuration.


I have used R Consulting’s Office 365 Service and I’m very happy with their knowledge and efficiency. They delivered on time with proper documentation and even they provide training with minimal cost. I would highly recommend them. There pricing is also very reasonable and affordable.
ReplyDelete